To enable HTTP compression in IIS 6.0
1. Open IIS Manager.
2. Right click Web Sites node and choose Properties.
3. Select Service tab.
4. Check Compress application files to enable dynamic compression.
5. Check Compress static files to enable static compression.
6. Click Browse next to Temporary directory: field and navigate to the folder where you will keep compressed files.
7. Choose whether you will be limiting temporary files directory size or not and click OK. (screenshot)
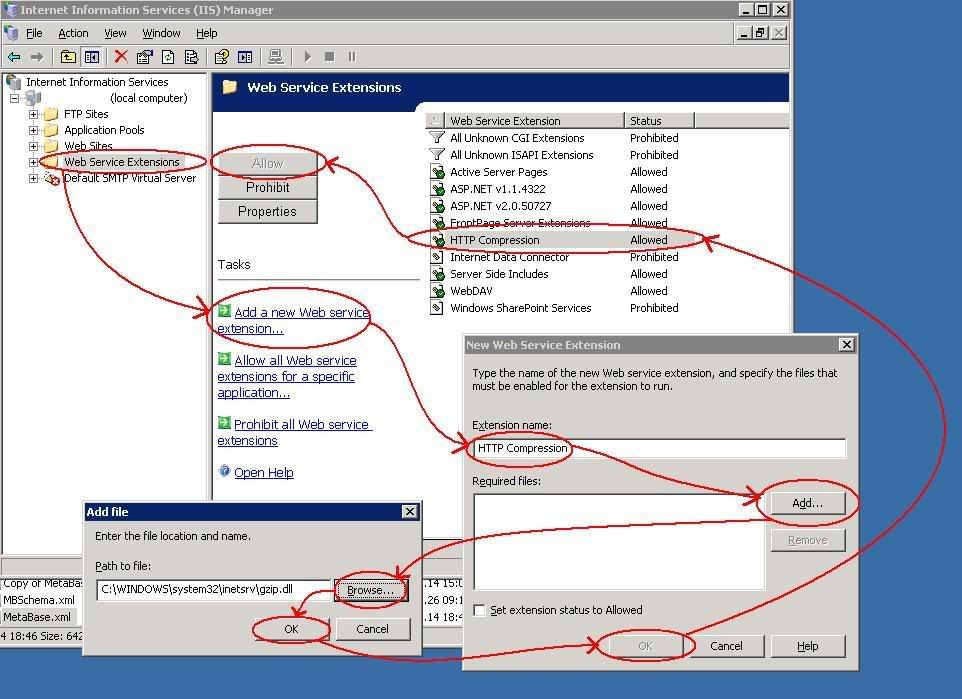
8. Go to Web Services Extension node and click Add new Web service extension..
9. Enter Extension name for example "HTTP Compression" click Add then in the Add file window click Browse and navigate to "C:\windows\system32\intetsrv" find gzip.dll select it and click Open. Click OK and OK again.
10. In the Web Service Extension list select "HTTP Compression" you've just added change its status to Allowed by clicking Allow button found on the left. (screenshot)
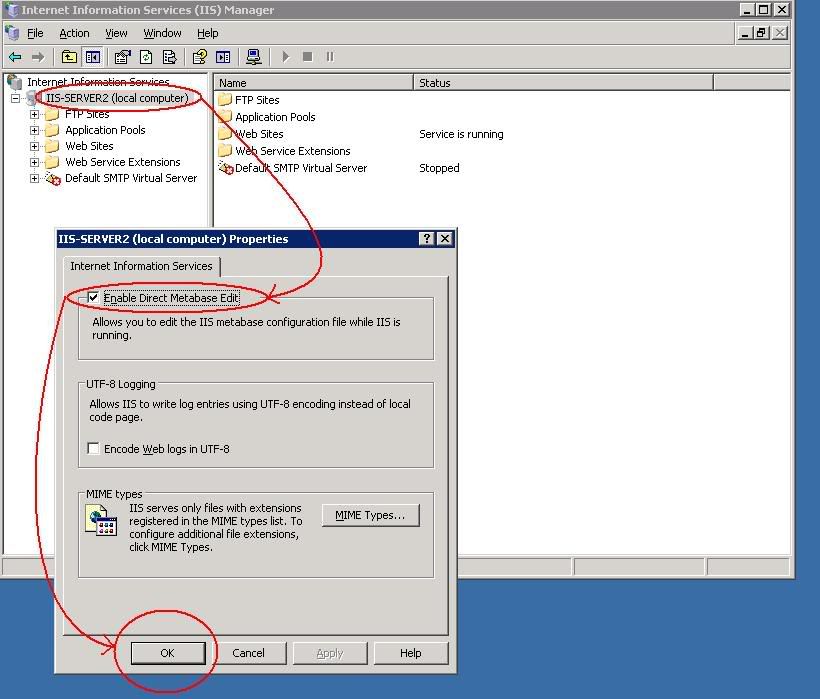
11. In IIS Manager right click your server node and choose Properties.
12. Check Enable Direct Metabase Edit and click OK. (screenshot)
13. Open Explorer and navigate to "C:\Windows\System32\inetsrv" find Metabase.xml file and before modifying it make a backup copy.
14. Open Metabase.xml in text editor and find string:
Location ="/LM/W3SVC/Filters/Compression/gzip"
15. Config values to suit your needs:
HcDoDynamicCompression="TRUE" (to enable compression of dynamic content)
HcDoOnDemandCompression="TRUE" (to enable compression of static files that are not compressed yet)
HcDoStaticCompression="TRUE" (to enable compression of static content)
HcDynamicCompressionLevel="10" (level of dynamic compression. Higher level equals better compression rate, but requires more CPU resources)
HcFileExtensions="htm
html
txt"
(file types to include in static compression, one per line)
HcOnDemandCompLevel="10" (level of OnDemandCompression)
HcPriority="1"
HcScriptFileExtensions="asp
dll
aspx
cs
exe
pdf"
(file types to include in dynamic compression, one per line)
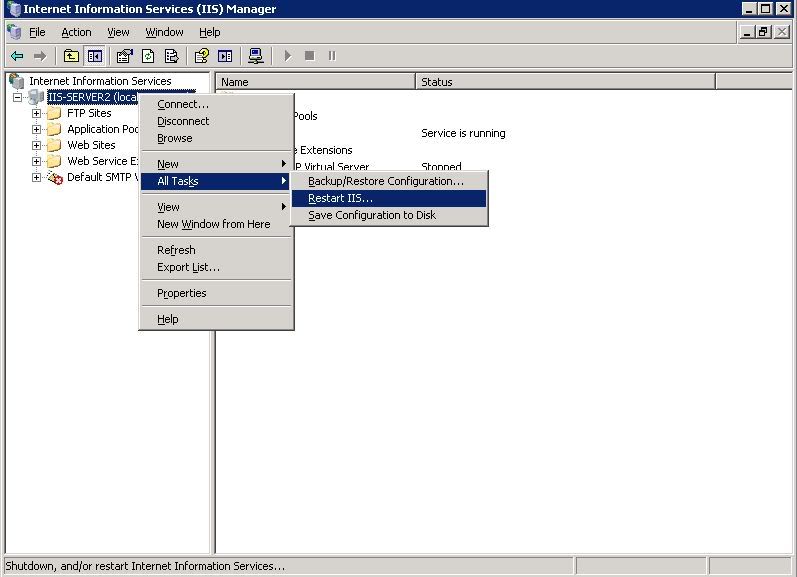
16. Save and close Metabase.xml and restart IIS server by right clicking your server node in IIS Manager and choosing All Tasks->Restart IIS... (screenshot)
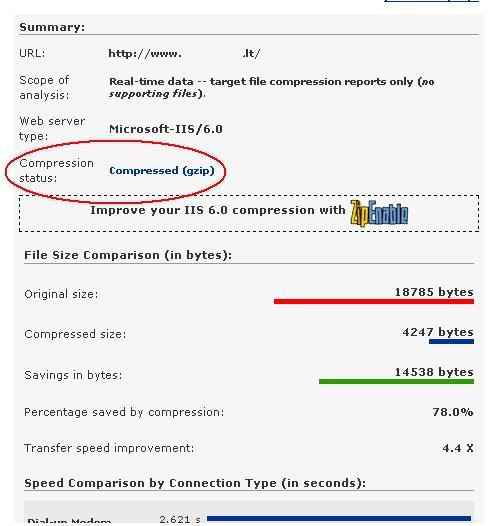
17. Check if compression is working
go to http://www.seoconsultants.com/tools/compression.asp enter your URL and press the Check Compression button. If your site is compressed you'll see Compression status: Compressed (gzip). (screenshot)
Now you might want to disable compression for some sites, to do this you need to run the following command in the command prompt:
adsutil set w3svc/1690634459/DoDynamicDompression false
Or if you want to disable compression on specific folder or file in the site you would type this:
adsutil set w3svc/1690634459/root/forum/DoDynamicCompression false
Replace 1690634459 with the ID of your website which can be found in IIS Manager, Web Sites node "Identifier" column.
If you want to disable Static Compression for specific site replace "DoDynamicCompression" with "DoStaticCompression".
If you want disable compression for All sites but one, you can do this in the following way:
First disable compression for all sites by running command in the command prompt:
adsutil set w3svc/filters/compression/parameters/HcDoStaticCompression false
Then enable compression for one or multiple sites of your choice:
adsutil set w3svc/1690634459/DoStaticCompression true
Links:
http://www.dotnetjunkies.com/Article/16267D49-4C6E-4063-AB12-853761D31E66.dcik
http://www.microsoft.com/technet/prodtechnol/WindowsServer2003/Library/IIS/502ef631-3695-4616-b268-cbe7cf1351ce.mspx?mfr=true
Showing posts with label IIS. Show all posts
Showing posts with label IIS. Show all posts
2008-12-14
2008-10-15
Access your website without www in front
Today I had an assignment to make a site accessible without www in front of it.
As I am IT noob it was new for me so it took me some time.
So what you need to do is create a new Host (A) type DNS record which will point to your web server.
In Windows Server 2003 DNS role it is done like this:
1. Go to Administrative Tools and open DNS.
2. Navigate to Forward Lookup Zones and find the domain you want to make accessible without www.
3. Right click this domain folder and choose New Host (A).
4. Leave the Name field blank (will be the same as parent folder).
5. Enter IP address of your web server in the IP Address field and click Add Host.
If you host multiple sites on your web server you will probably need to do the following (if you host on IIS 6.0):
1. Open IIS manager on your web server.
2. Navigate to Web Sites and find your site.
3. Right click and open Properties.
4. On the Web Site tab next to IP Address click Advanced... button.
5. There you should already see "www.yourdomain.com" record, click Add and enter yourdomain.com in the Host Header value field. Click OK, close all dialogs and check if it works.
Links:
http://www.boutell.com/newfaq/creating/withoutwww.html
Subscribe to:
Posts (Atom)