2019-02-09

Running phpBB3 forum on freenas jail (FreeBSD)

I. Create jail


1) creating jail with name "phpbb3"
 iocage create -n phpbb3 -r 11.2-RELEASE 

2) (optional) enable dhcp
iocage set vnet=on bpf=yes dhcp=on phpbb3

3) start jail
iocage start phpbb3

II. Install apache


1) login into jail
iocage console phpbb3

2) install apache
pkg install apache24 confirm prompts with y

3) configure apache service
sysrc apache24_enable=yes

4) start apache
service apache24 start

5) verify it works, browse to http://your_jail_ip you should see message "It works!"

III. Install php components


1) install php components
pkg install mod_php72 php72-mysqli php72-dom php72-iconv

2) copy sample php config file
cp /usr/local/etc/php.ini-production /usr/local/etc/php.ini

IV. Configure apache to use php


1) add apache configuration file for php
nano /usr/local/etc/apache24/Includes/php.conf
enter the following contents:

DirectoryIndex index.php index.html SetHandler application/x-httpd-php SetHandler application/x-httpd-php-source

2) restart apache service service apache24 restart

3) create file for php test in default document root
nano /usr/local/www/apache24/data/info.php enter contents: save and exit

4) browse to http://your_jail_ip/info.php you should see a page with various php details.

5) delete the test file
rm /usr/local/www/apache24/data/info.php

V. Install Mysql

1) install mysql server package
pkg install mysql80-server
2) enable mysql service 
sysrc mysql_enable=yes
3) start mysql service
 service mysql-server start
4) run script to secure mysql installation
mysql_secure_installation
  • choose Y for VALIDATE PASSWORD COMPONENT, in this example we choose level 1 MEDIUM for validation policy
  • enter new password for root and re-enter it
  • choose y to remove anonymous users
  • choose y to allow only local login for root
  • choose y to remove default database and access to it
  • choose y to reload privileges
5) create new database for phpbb3
 a) login to mysql
  myslq -u root -p
 enter your password when prompted
 b) enter command for db creation and hit enter:
 CREATE DATABASE phpbb3;

6) create mysql user
CREATE USER 'phpbb3user'@'localhost' IDENTIFIED BY 'password123'

7) assign permissions for new users to phpbb3 database
 GRANT ALL PRIVILEGES ON phpbb3.* TO 'phpbb3user'@'localhost';

tbc...

8) legacy authentication stuff

9) reload privileges
FLUSH PRIVILEGES;

10) exit mysql
exit


VI. Install phpbb3

1) install package
pkg install phpbb3


tbc


Links used: https://www.digitalocean.com/community/tutorials/how-to-install-an-apache-mysql-and-php-famp-stack-on-freebsd-10-1 https://forums.freebsd.org/threads/installing-www-phpbb3.68616/ https://forums.freenas.org/index.php?threads/iocage-helper-thread.59988/
https://www.digitalocean.com/community/tutorials/how-to-create-a-new-user-and-grant-permissions-in-mysql

2018-10-11

Change SCCM Offline Servicing location (with powershell)


There is plenty google results for how to change SCCM Offline Servicing location, but most of those that I've checked involve using wbemtest.exe, I wanted a way to do that with powershell, so here it is:

#your SCCM Site Name
$SiteName = "ITO" 
#the drive where you want offlince servicing to happen
$TargetDrive = "D:"

$CimInstance = Get-CimInstance -Namespace root/SMS/site_$SiteName -ClassName SMS_SCI_Component -Filter "SiteCode='$SiteName' and ItemName like 'SMS_OFFLINE_SERVICING_MANAGER%'"
($CimInstance.Props | Where-Object {$_.PropertyName -eq "StagingDrive"}).Value1 = $TargetDrive
Set-CimInstance -CimInstance $CimInstance -PassThru

Links:
https://techcommunity.microsoft.com/t5/Enterprise-Mobility-Security/Customizing-Offline-Servicing-of-Operating-System-Images/ba-p/247778
https://docs.microsoft.com/en-us/powershell/module/cimcmdlets/get-ciminstance?view=powershell-6
https://docs.microsoft.com/en-us/powershell/module/cimcmdlets/set-ciminstance?view=powershell-6

2017-06-08

The target principal name is incorrect. Cannot generate SSPI context.

You might encounter this error when trying to connect remotely to MS SQL via management studio. Basically it means that Kerberos is not working, you can verify this by running this query while connected to MS SQL locally:

select auth_scheme from sys.dm_exec_connections where session_id=@@spid

 You should see NTLM in the result if Kerberos is not working.

The error says that SPN is incorrect, however you verify that SPN is actually ok:
SETSPN -L

Additionally on domain controller you might see similar event logged:


While processing an AS request for target service krbtgt, the account did not have a suitable key for generating a Kerberos ticket (the missing key has an ID of 1). The requested etypes : 18 17 3. The accounts available etypes : 23 -133 -128. Changing or resetting the password of will generate a proper key.

In my case I solved this by changing the SQLServer service account to a newly created one, since I was not able to reset the password for it, due to the fact it might have been used elsewhere. Generally resetting password for that account as suggested in the event log should fix this also. 

Links:
https://blogs.msdn.microsoft.com/meer_alam/2015/05/10/the-target-principal-name-is-incorrect-cannot-generate-sspi-context/ 

2017-03-29

Enabling AntiSpam agents on Exchange 2016 Mailbox server, including Connection Filtering Agent

If you have no Edge server and want to use Exchange anti spam features, you probably already know how to install antispam agents on mailbox server:

& $env:ExchangeInstallPath\Scripts\Install-AntiSpamAgents.ps1

However this does not enable connection filtering agent, which is by far the most useful of all the agents since it allows to use online blacklists. To enable this service in exchange shell run (one line):

Install-TransportAgent -Name "Connection Filtering Agent" -TransportService FrontEnd -TransportAgentFactory "Microsoft.Exchange.Transport.Agent.ConnectionFiltering.ConnectionFilteringAgentFactory" -AssemblyPath "C:\Program Files\Microsoft\Exchange Server\V15\TransportRoles\agents\Hygiene\Microsoft.Exchange.Transport.Agent.Hygiene.dll"

You will also need to configure it with your favorite RBLs, for example:

Add-IPBlockListProvider -Name zen.spamhaus.org -LookupDomain zen.spamhaus.org -AnyMatch $true -Enabled $true
Add-IPBlockListProvider -name bl.spamcop.net -LookupDomain bl.spamcop.net -AnyMatch $true -Enabled $true
Add-IPBlockListProvider -name b.barracudacentral.org -LookupDomain b.barracudacentral.com -AnyMatch $true -Enabled $true
Enable-TransportAgent -TransportService FrontEnd -Identity "Connection Filtering Agent"
Restart-Service MSExchangeTransport

Links:

2015-01-27

Publishing FTPS on TMG 2010.

For instructions on creating FTP site on IIS read this post - Creating FTP or FTPS on IIS 8.5 (with Active Directory User isolation).
 
I. Configure FTP for Firewall Support (IIS 8.5)
1. Open IIS Manager, in connections pane select your FTPS server and in Features View double click FTP Firewall Support
 
 2. Enter port range for Data Channel for example we will be using 50100-50200. Also enter external IP of your firewall in this example yyy.yyy.yyy.yyy and in Actions pane click Apply.
Note: do not forget to allow this port range on your FTPS servers windows firewall, if it is not added automatically.
 
3. Repeat same step on FTP site level. Select your FTP site and in Feature View double click FTP Firewall Support.
 
 4. Data Channel Port Range should be greyed out with the value you specified earlier. For External IP Address of Firewall enter your firewalls external IP: yyy.yyy.yyy.yyy and in Actions pane click Apply.
 
 
II. Create Publishing rule on TMG
1. Open Forefront TMG console, right click Firewall Policy and choose New->Create new Non-Web Server Protocol Publishing Rule...
 
 
2. Enter the name of your FTPS rule for example "FTPS" and click Next
 
3. Enter IP address of your FTPS server
 
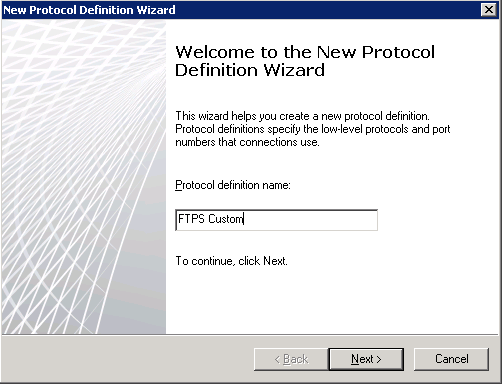
3. Click New... to create new protocol definition
 
4. Specify name for you protocol definition for example "FTPS Custom" and click Next
 
4. Click New to add port range for your protocol definition


5. Specify the following
Protocol type: TCP
Direction: Inbound
Port Range: From: 21 To: 21
and click OK
 
6. In New Protocol Definition Wizard click New one more time to add port range for data channel we specified in step I.2.
Specify the following
Protocol type: TCP
Direction: Inbound
Port Range: From: 50100 To: 50200
and click OK
 
7. Check if protocol configuration is fine and click Next
 
8. On following step leave the default No selected and click Next
 
9. Double check the settings and click Finish
 
10. After protocol definition has been created we can proceed with the rule. Click Next
 
11. Select checkbox next to External network and click Address... to specify external IP on which the FTPS service rule will be listening
 
12. Select Specified IP addressess on the Forefront TMG computer in the selected network and add the IP you specified in step I.2 (in this example yyy.yyy.yyy.yyy). After that click OK
 
13. Click Next to proceed
 
14. Click Finish to end the Publishing Rule Wizard
 15. Click Apply in TMG console and then click OK. Wait a few minutes and you are ready to test your FTPS server from external client.


 Links: